
Part 1
Why macOS Reversing?
Whether you’re a student dipping your toes into cybersecurity or a junior analyst eager to go beyond Windows-based threats, macOS reversing is a rewarding (and often overlooked) entry point into reverse engineering. While Windows dominates the malware conversation, Apple systems are far from immune. In some cases, threats targeting macOS slip under the radar due to lack of tooling or expertise.
This series will help you build that foundation. We’ll explore the structure of macOS binaries, how to safely analyze them, and how to recognize potential red flags and suspicious indicators. Even if you’re brand new to reversing, you’ll leave with a clearer picture of how malware works and how to dissect it.
macOS Reversing Using Open Source Tools
No IDA Pro license? No problem. We’ll lean on open-source tools like Ghidra, Radare2, and more throughout this journey.
The Challenge of Learning macOS Reversing
A couple of weeks back, I picked macOS reversing as my learning “rock” to kick that week. Partly because I wanted to apply knowledge I had read in books to the test, partly because macOS threats are on the rise, and partly because I stumbled across a great walkthrough (shoutout to Alexandre Borges’ Malware Analysis Series).
This write-up is a beginner-friendly internal resource on reversing macOS malware. It compiles notes, tools, tips, and examples from Borges’ macOS installment of the series, with some added context from my experience. I’ve also been trying my hand at Ghidra, so Ghidra-focused notes are included for those without an IDA license.
Lab Setup to Study macOS Malware
To follow along or run your own experiments, you’ll need:
- A macOS VM (or native Mac) running at least macOS Sonoma: This gives you a safe environment for testing and analysis without risking your primary system.
- Xcode: Apple’s developer toolkit. While we won’t use it directly for reversing, it’s necessary for some command-line tools like otool and codesign.
- Ghidra: An open-source reverse engineering framework developed by the NSA. It can disassemble, decompile, and analyze binaries.
- Radare2: A command-line reverse engineering framework. It’s fast and scriptable, and while it has a steeper learning curve than Ghidra, it’s powerful for triage and automation.
- Class-dump: Useful for extracting Objective-C class interfaces from binaries, especially when symbols are stripped.
- (Optional, but highly recommended): maloverview, jtool2, and disarm
Tip: You don’t need to master all these tools at once. Start with Ghidra and a terminal, then layer on others as needed.
Core Concepts in macOS Binary Analysis
Mach-O 101
macOS applications are typically compiled into Mach-O (Mach Object) binaries. This format is used across Apple platforms and defines how the operating system should load and execute the application.
The Structure of a Mach-O File
A Mach-O file is made up of several key parts:
- Header: This is the first part of the file and acts like a table of contents. It tells the OS what kind of binary this is (executable, library, etc.), what CPU architecture it was built for (like x86_64 or arm64), and how many load commands are coming next.
- Load commands: These are a list of instructions that tell the OS how to load the binary into memory. They point to the locations of things like the main entry point, dynamic libraries the app uses, and segments (chunks of code or data).
- Segments: These define ranges of memory to be used for specific purposes, like executable code or global data. Common segments include:
- __TEXT: where the actual executable instructions live
- __DATA: where variables, strings, and other data is stored
- Sections: Each segment is broken into more specific sections. For example, inside __TEXT, there’s often a __text section (actual code) or __cstring (literal string constants, quoted strings in the source code) and inside __DATA you might find __data (initialized global variables).
Why this matters: When you’re analyzing a binary, understanding what each section holds helps you locate the interesting stuff such as the main function or embedded strings. Load commands often reveal the binary’s architecture, symbols, entry point, and code signature. All critical during malware triage.
What is a Fat Binary?
You might be surprised to learn that many macOS applications contain multiple versions of the same program inside a single file. These are called fat binaries (also known as universal binaries), and they’re designed to support different hardware architectures, primarily Intel (x86_64) and Apple Silicon (arm64).
Why Do Fat Binaries Exist?
In 2020, Apple began transitioning from Intel-based Macs to its own ARM-based chips (M1, M2, etc.). To ensure that apps could run smoothly on both old and new Macs, developers began distributing binaries that included support for both architectures in a single package. This way, one app download works across all devices. When your system opens the app, it reads only the section it understands and skips the rest.
How to Split a Fat Binary
When analyzing a fat binary, tools like Ghidra, IDA, or even otool often get confused unless you’re specific about which architecture to examine. For example, Ghidra might ask you which slice to analyze, or worse, fail to process the file at all.
To avoid this, we can use the lipo tool to extract a single architecture slice from the fat binary:
- lipo -extract arm64 original_binary -output binary_arm64
This gives us a clean, single-architecture binary that tools can analyze more reliably.
Tools to Know
- otool: inspect mach-O headers and segments
- lipo: split fat binaries
- codesign and spctl: verify signatures and notarization
- jtool2, disarm, class-dump: extract symbol/runtime info
- Radare2: fast triage and string/function discovery
Where Stairwell Fits In
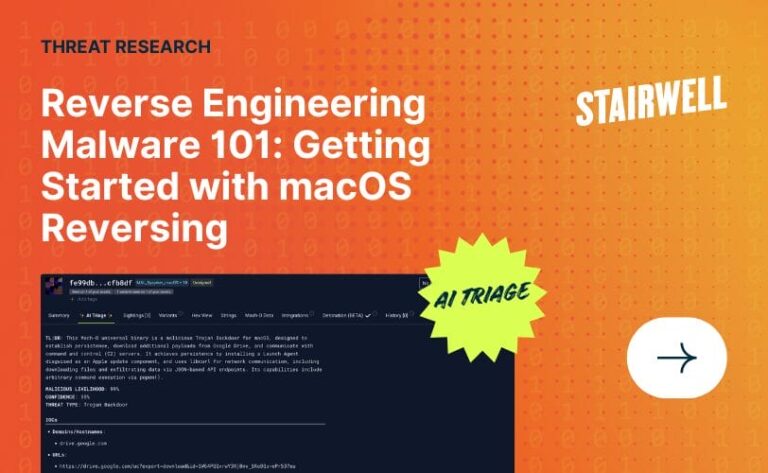
If all of this manual reversing sounds intense, that’s because it is. Traditional macOS reversing requires time, technical expertise, and juggling several tools just to answer basic questions about a file. And while it’s important to understand what’s happening under the hood, the good news is: you don’t always have to do it the hard way.
Stairwell provides a faster, smarter way to analyze and respond to macOS threats. With the platform’s built-in support for Mach-O files, you can ingest binaries directly from threat feeds or endpoint activity and quickly get structured, actionable insights. And with Stairwell Intelligent Analysis (SIA), our new AI-assisted triage system, the process is even easier:
- Automatically extracts and summarizes suspicious strings
- Flags potentially malicious behavior and gives context
- Identifies known malware families when patterns are recognized
- Works seamlessly alongside YARA rules and threat hunting workflows

This blog series walks through what a human analyst might do manually – pulling binaries apart, inspecting segments, and hunting for red flags. But SIA can now perform the same work in seconds, making this guide a useful behind-the-scenes view of what the platform is doing for you.
So whether you’re building up your fundamentals or just curious how your tools actually work, this knowledge empowers you to use Stairwell more effectively and trust what it tells you.
Part 1 Recap & What’s Next
So far, we’ve covered the essentials – what makes macOS binaries unique, how fat binaries work, what the Mach-O format looks like, and how to set up a reversing environment using tools like Ghidra and lipo.
Whether you’re just getting started or brushing up on your fundamentals, these concepts lay the groundwork for understanding how macOS malware behaves in the wild.
In Part 2 of this series, we’ll take everything we’ve learned so far and walk through a real-world macOS malware sample, from triage to disassembly.